How Do You Place Eggs in an Incubator in 5 Easy Steps?
To place eggs in an incubator in five easy steps, start by preheating the incubator to about 99.5°F and maintaining humidity around 50-55%. Proper temperature and humidity are crucial for successful hatching.
Next, choose fertile eggs from a reliable source and handle them gently without washing. Washing can remove the protective bloom on the eggshell, which helps prevent bacteria from entering.
Then, place each egg pointed-end down in the tray, spacing them evenly about an inch apart to allow airflow. Proper spacing ensures even heat distribution and prevents eggs from touching.
Finally, close the lid securely to keep conditions stable.
Following these basics will set a strong foundation for successful hatching—keep going to uncover helpful details.
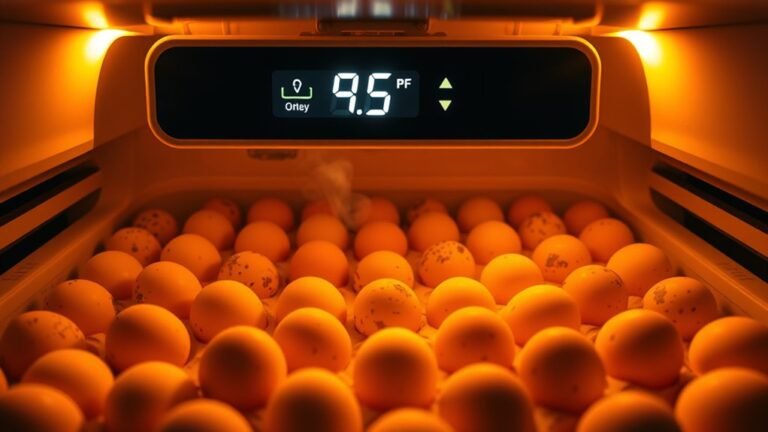
Get Your Incubator Ready: Check Temperature and Humidity

Before placing your eggs, make sure you’ve preheated the incubator to a steady 99.5°F (37.5°C) and set the humidity between 50-55%. Use a reliable thermometer and hygrometer to verify these ideal conditions. Adjust the water levels in the incubator’s trays carefully to maintain the proper humidity.
It’s vital to monitor and record temperature and humidity regularly to avoid fluctuations that could harm embryo development. Keep an eye on both readings daily, making minor adjustments as needed. By maintaining consistent temperature and humidity, you create the perfect environment for your eggs to develop.
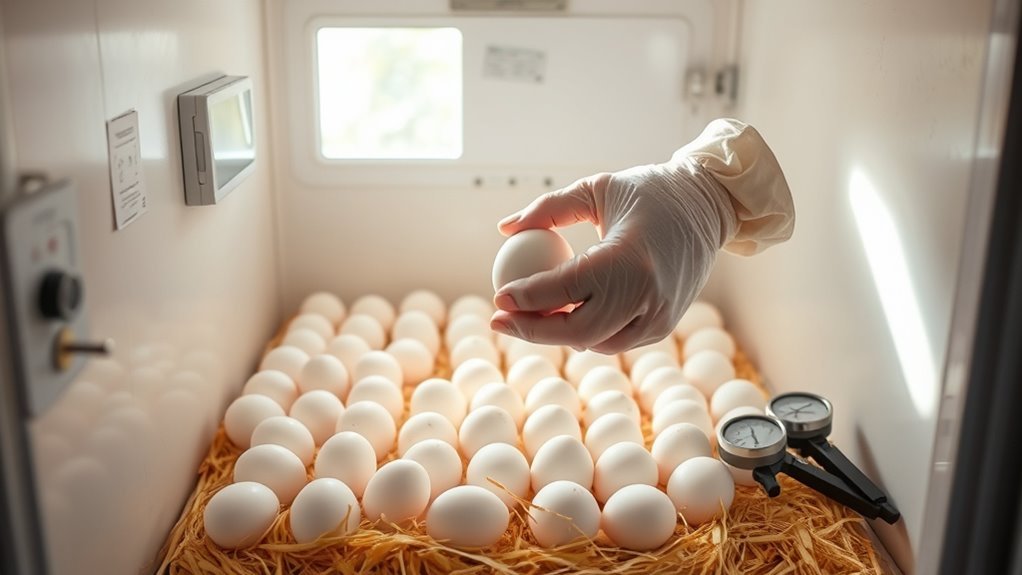
Select and Handle Fertile Eggs Carefully Before Setting

When selecting eggs for incubation, make certain they come from hens housed with a rooster, as grocery store eggs usually won’t hatch. Only use fertilized eggs and handle carefully with clean hands or gloves to maintain hygiene and prevent contamination. Collect eggs daily to ensure egg freshness and either incubate immediately or store them properly at 55-60°F with the pointed end down.
Avoid washing eggs before incubation to preserve the protective bloom and reduce infection risk.
| Aspect | Best Practice |
|---|---|
| Egg Selection | Fertilized eggs only |
| Handling | Clean hands or gloves |
| Storage | 55-60°F, pointed end down |
| Egg Collection | Daily to ensure freshness |
Proper handling and cleanliness during egg collection and storage set the stage for successful incubation.
How to Place Eggs Pointed-End Down in the Incubator

After selecting and handling your fertile eggs with care, you’ll want to place them pointed-end down in the incubator. This position guarantees the embryo develops properly and the air cell stays in the right place for a successful hatch.
Follow these steps for correct placement:
- Use an egg tray designed to hold eggs securely with the pointed end down to maintain proper position throughout incubation.
- Gently place each egg into the tray, avoiding cracks or damage; never wash eggs before setting to keep the protective bloom intact.
- Mark each egg with a pencil to track when you turn them, ensuring they remain in the correct orientation during incubation.
Proper placement and turning in the incubator will maximize your chances of a healthy hatch.
Space Eggs Evenly to Avoid Overcrowding in the Tray
Since proper airflow is essential for embryo development, you’ll want to space eggs evenly in the incubator tray, keeping them at least one inch apart. Proper spacing prevents overcrowding, which can restrict air circulation and cause uneven temperature and humidity distribution.
Use a tray with individual compartments or slots to maintain consistent airflow around each egg and ensure stable placement. Arranging eggs with the pointed end down and rounded end up in these compartments supports proper circulation and makes turning and candling easier without disturbing neighbors.
Avoid stacking eggs or placing them too close together, as this disrupts the arrangement and compromises embryo health. By maintaining even spacing and using a tray designed for proper airflow, you’ll create the ideal environment for your eggs to develop successfully.
Close the Incubator Lid and Maintain Stable Conditions
To guarantee your eggs develop properly, close the incubator lid securely right after placing the eggs inside. Since you’ve used a preheated incubator, maintaining stable conditions is key to perfect hatching.
Here’s what you need to do:
- Close the incubator lid immediately to keep a consistent environment, preventing fluctuations in temperature and humidity.
- Avoid jostling by placing eggs gently with proper placement (larger end up) to protect the embryos.
- Perform regular checks without opening the lid unnecessarily to ensure temperature and humidity remain stable.
Frequently Asked Questions
How to Place Eggs in an Incubator Step by Step?
You handle eggs cleanly, then place them with the larger end slightly elevated. Space them evenly for airflow, mark each one to track turning, and use an automatic turner if available to guarantee consistent rotation.
How Do You Incubate Eggs for Beginners?
You’ll keep eggs pointy end down, turn them thrice daily, and maintain steady temperature and humidity. Use clean hands, mark eggs for tracking, and space them evenly to guarantee healthy embryo development and proper air circulation.
What Direction to Place Eggs in an Incubator?
You might think any way works, but you should place eggs with the pointed end down. This guarantees the embryo develops properly.
Keep them stable and mark one side to track turning easily throughout incubation.
How to Know Which Eggs to Put in an Incubator?
You’ll want to pick clean, uncracked eggs from a fertile source, collected within the last week. Handle them gently with clean hands, and avoid washing to keep the protective bloom intact for better hatch rates.
Conclusion
Now that you know how to place eggs in your incubator, you’re set for success. Imagine Sarah, who carefully checked her incubator’s temperature and placed her eggs pointed-end down with enough space.
Because she maintained stable conditions, her hatch rate soared. By following these simple steps—preparing your incubator, handling eggs gently, spacing them well, and closing the lid—you’ll give your eggs the best chance to hatch healthy chicks.
Remember, placing eggs in an incubator correctly is crucial for a successful hatch. Proper egg placement, temperature control, and gentle handling all contribute to healthy chick development. Following these guidelines ensures your incubation process is smooth and effective.