How to Dye Eggs With Cool Whip in 10 Simple Steps
To dye eggs with Cool Whip, start by boiling and cooling fresh eggs. Then soak them briefly in vinegar to help colors stick, ensuring a vibrant finish.
Next, spread a 1-inch layer of Cool Whip on a flat surface. Add drops of food coloring and gently swirl to create beautiful patterns.
Roll your eggs in the mixture and let them sit for 10–15 minutes to achieve vibrant marbled effects. Afterward, rinse and pat dry carefully.
Store the dyed eggs chilled and handle them gently to keep your colorful designs intact. Keep going to discover tips for perfecting your colorful creations.
Gather Ingredients and Materials for Cool Whip Easter Eggs

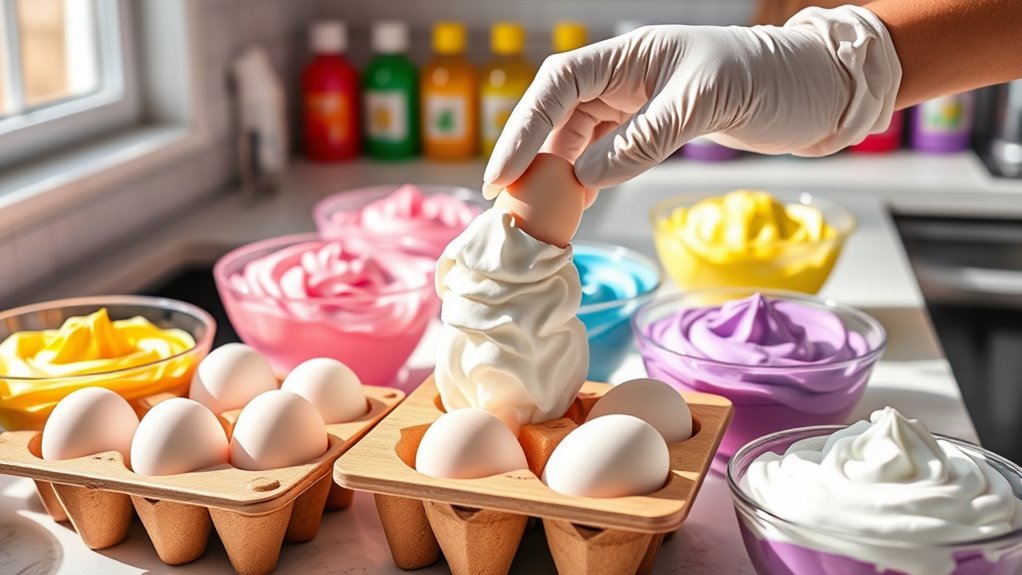
Before you start dyeing eggs with Cool Whip, gather all the necessary ingredients and materials to guarantee a smooth process. You’ll need fully cooled, unpeeled white hard-boiled eggs for the best results. Grab some white vinegar, which helps the dye stick better to the shells.
Next, spread a layer of whipped topping—like Cool Whip—on a large plate or baking sheet, creating a smooth surface to work on. Choose your food coloring carefully; gel or liquid types in squeeze bottles work best for vibrant, easy-to-control colors.
If you want to create swirls, have toothpicks or skewers handy to mix the food coloring into the whipped topping. With these materials ready, you’ll be set to dye your eggs beautifully.
Prepare Hard-Boiled Eggs for Cool Whip Dyeing

Start by choosing fully cooled, unpeeled white hard-boiled eggs for the best color results. Soak them in white vinegar for a few minutes to remove the shell’s natural coating and help the dye stick.
After soaking, make sure to dry the eggs completely before you move on to the Cool Whip dyeing process.
Selecting Eggs Properly
Although it might seem simple, selecting the right eggs is crucial for vibrant Cool Whip dyeing. Choose fresh eggs with smooth shells to guarantee even color absorption and prevent cracking during dyeing. Always use fully cooled, unpeeled hard boiled eggs—warm eggs can cause the dye to run or create uneven patterns.
Avoid any eggs that show cracks or damage, as these can leak and ruin your design. Make sure the eggs are completely cooled before you start the dyeing process; this helps the Cool Whip mixture adhere properly and enhances the marbling effect.
Taking the time to pick the best eggs sets the foundation for beautiful, consistent results when you create your colorful masterpieces with Cool Whip.
Vinegar Soak Benefits
When you soak hard-boiled eggs in white vinegar for a few minutes, you help remove the shell’s natural bloom, which allows the dye to absorb more effectively. This vinegar soak is a key step in egg shell preparation before Cool Whip dyeing. The vinegar’s acidity reacts with the calcium carbonate in the shell, making the surface more porous and ready to soak up vibrant colors.
Soaking for 2-5 minutes guarantees the shell stays strong without weakening, giving you a perfect base for marbled or tie-dye effects. After soaking, rinse the eggs thoroughly to remove any vinegar residue, leaving a clean surface for decorating. Incorporating this simple vinegar soak enhances the brightness and clarity of your egg dyeing results beautifully.
Cooling And Drying
Once your eggs finish boiling, let them cool completely at room temperature or in the refrigerator for at least 30 minutes to guarantee they’re ready for dyeing. Don’t peel the eggshells; keeping them intact helps the dye stick better during the Cool Whip process.
Before you start dyeing, gently pat the eggs dry with a paper towel or soft cloth to remove any excess moisture. Proper drying is essential because if the eggs aren’t completely dry, the Cool Whip can slide off, ruining your patterns.
If you’re not dyeing them right away, store the cool, dried eggs in the refrigerator. Handle them carefully to avoid cracks, ensuring your eggs stay perfect for vibrant, creative designs.
Soak Eggs in Vinegar to Help Colors Stick

Because the eggshell’s natural coating can block dye, soaking your eggs in white vinegar for a few minutes helps the colors stick better. When you soak eggs in vinegar for 2 to 5 minutes, the acetic acid reacts with the calcium in the shell, opening the pores and allowing the dye to penetrate more deeply.
This step is especially useful if you’re using natural or less vibrant food coloring since it enhances color intensity. Just be careful not to soak the eggs too long, as extended exposure can weaken the shell and make it prone to cracking.
After soaking, dry your eggs thoroughly to avoid diluting the dye or damaging the shell. This simple vinegar soak ensures your colors will be bright and last longer.
Spread Cool Whip Evenly on a Flat Surface
Although it might seem simple, spreading Cool Whip evenly is key to achieving vibrant, smooth egg dyeing. First, choose a clean, stable flat surface like a plate or baking sheet. Then, scoop out enough Cool Whip to create a layer about one inch thick.
Use a spatula or the back of a spoon to spread uniformly, smoothing it into a consistent, level layer. Avoid overloading the surface, as a half-inch to one-inch thickness is perfect for effective dyeing. Keeping the Cool Whip flat prevents it from sliding and ensures easy handling later.
This even base sets the stage for beautiful color patterns and smooth egg rolling, so take your time to get it just right.
Add Food Coloring and Swirl to Create Patterns
Start by choosing gel or liquid food coloring for bright, bold hues. Drop the colors onto the Cool Whip, then use a toothpick to swirl them gently, creating marbled patterns without overmixing.
Experiment with different amounts and swirling techniques to make each egg uniquely vibrant.
Choosing Food Coloring Types
When you add gel food coloring to Cool Whip, you’ll notice it creates more vibrant and concentrated hues than liquid or powder options, making your egg designs pop. Gel food coloring offers richer saturation, while liquid food coloring provides softer, more translucent shades. Food dye in powder form can also be used but may require more mixing.
Choosing the right type depends on the effect you want.
Consider these points when selecting your food coloring:
- Gel food coloring delivers intense colors and allows precise placement with squeeze bottles.
- Liquid food coloring blends easily for subtler tones and gentle swirls.
- Natural food dyes like beet juice or turmeric create delicate, earthy hues for unique patterns.
Experiment with these to achieve eye-catching, one-of-a-kind eggs every time.
Techniques For Swirling Colors
Once you add drops of different food coloring onto the spread-out Cool Whip, you can swirl them gently with a toothpick or skewer to create beautiful marbled patterns. Use swirling motions to draw through the colors, blending just enough for a subtle tie-dye effect without over-mixing. This careful marbling keeps distinct color areas vibrant and eye-catching.
Try adding more drops and swirling in different directions to experiment with unique designs. Remember, the key is to keep the mixture relatively unmixed for dramatic, multi-colored swirls. Swirl only until you achieve the patterns you want, then stop to preserve the contrast.
These techniques let you create stunning, colorful eggs with dynamic, swirling patterns that stand out beautifully.
Creating Unique Color Patterns
Adding multiple drops of different food coloring onto the Cool Whip and swirling them gently with a toothpick lets you create stunning, marbled patterns on your eggs. These swirling patterns produce unique, random designs, ensuring each egg is one-of-a-kind.
To make your marbled eggs pop, try these tips:
- Use contrasting food coloring like pink, purple, and aqua for vibrant streaks.
- Swirl gently without over-mixing to preserve intricate, multi-colored swirls.
- Blend colors slightly for beautiful, soft transitions between hues.
Roll Eggs Gently in the Colored Cool Whip
Although it might seem tricky at first, gently rolling each hard-boiled egg in the colored Cool Whip guarantees an even coating without smudging the patterns. Hold the egg by its tapered ends to keep control and avoid pressing too hard. Use light pressure and a slow, gentle rolling motion to dye eggs effectively without disturbing the colors.
Roll the egg in different directions to create a beautiful marbled or swirl effect with multiple hues. This gentle rolling technique in the Cool Whip ensures the colors blend naturally while preserving distinct patterns. Remember, taking your time with this step will give you vibrant, eye-catching eggs that showcase the unique patterns created by the dye and the cool whip’s creamy texture.
Let Eggs Sit 10–15 Minutes for Marbled Color
Since the dye needs time to fully develop, let your eggs sit in the colored Cool Whip for 10 to 15 minutes. This wait allows the dye to penetrate the eggshells, creating stunning marbled patterns. Resist the urge to remove them too soon—shorter times yield fainter colors, while longer soaking intensifies the marbled effect.
To get the best results when you dye eggs with Cool Whip, keep these tips in mind:
- Handle eggs gently to avoid disturbing the swirling dye patterns.
- Allow the full 10–15 minutes for vibrant, well-developed marbled colors.
- Remember that the Cool Whip acts as a unique medium, enhancing the dye’s texture and depth.
Patience here pays off with beautifully marbled eggs you’ll love.
Clean and Dry Eggs to Preserve Vibrant Dye
Before you start dyeing, make sure your eggs are clean and completely dry to help the color stick better. Rinse off any residue and gently pat them dry without scrubbing to keep the shell intact.
Proper drying prevents smudges and keeps your colors bright and vibrant.
Importance Of Egg Cleanliness
To get vibrant, streak-free colors when dyeing eggs with Cool Whip, you’ll want to start with clean, completely dry eggs. Egg cleanliness is vital because dirt or residue can block dye absorption, leading to dull or uneven colors. Using properly dried eggs ensures that no moisture dilutes the dye mixture, preserving the intensity and preventing smudging.
Before you dye eggs with Cool Whip, make sure to:
- Rinse eggs thoroughly to remove any dirt or oils from the shell
- Use unpeeled, cooled, hard-boiled eggs for ideal dye adherence
- Pat eggs dry carefully with a paper towel or soft cloth to avoid water spots
Focusing on cleanliness and dryness helps you achieve stunning, vibrant eggs while reducing the risk of spoilage during decoration.
Proper Drying Techniques
While dyeing eggs with Cool Whip creates beautiful colors, you’ll need to dry them carefully to keep those vibrant patterns intact. To dry eggs properly, gently pat dry each one with a soft cloth or paper towel to remove excess dye without smudging. Avoid rubbing, as it can ruin your design.
Then, place the eggs on a clean towel in a single layer to air dry completely. Make sure they’re in a cool, well-ventilated area to speed drying and preserve the dye.
| Step | Tip |
|---|---|
| Pat dry | Use gentle dabbing, no rubbing |
| Air dry placement | Single layer on clean towel |
| Drying location | Cool, well-ventilated space |
| Final check | Eggs completely dry before storing |
Following these steps helps dry eggs perfectly, keeping your colors vibrant.
Effects On Dye Vibrancy
Because moisture dulls the colors, you’ll want to make sure your eggs are completely dry before dyeing them with Cool Whip. Wet eggshells can cause the whipped cream to slide off, resulting in faded marbling and reduced dye vibrancy.
To get the sharpest, richest colors, focus on drying your eggs thoroughly after rinsing. Use a clean, dry towel to pat them down gently—this simple step prevents residual water from diluting the dye and ensures even color distribution.
Keep in mind these tips for maintaining dye vibrancy with dry eggs:
- Always pat eggs dry with a lint-free towel before applying whipped cream dye.
- Avoid rinsing eggs immediately before dyeing; dry them well if you do.
- Store eggs in a dry area to prevent moisture buildup prior to decorating.
Store Cool Whip Dyed Eggs Safely Before Use
Although dyeing eggs with Cool Whip adds a fun twist, you still need to store them properly to keep them fresh and safe. After dyeing, make sure to store your eggs in the refrigerator at or below 40°F. Keep the eggs unpeeled and place them in a covered container or egg carton to prevent contamination and absorption of odors.
You should consume or display these cool whip dyed eggs within 3 to 7 days for the best quality and safety. If you plan to keep them longer, store the eggs in a bowl of ice or cold water inside the fridge to maintain freshness. Never leave your eggs at room temperature for more than 2 hours to avoid bacterial growth and spoilage.
Troubleshoot Dyeing Problems and Creative Variations
Proper storage keeps your Cool Whip dyed eggs fresh, but sometimes the dyeing process itself can present challenges. If your eggs aren’t absorbing color well, soak them in vinegar for at least 5 minutes before applying the whipped topping.
Soak eggs in vinegar for 5 minutes to improve color absorption before applying Cool Whip dye.
Over-mixing or using too much food coloring can cause dull or muddy colors. For brighter, distinct swirls, gel food coloring works best. To avoid smudging, dry eggs thoroughly after rinsing.
Try these tips for creative variations:
- Swirl different food coloring shades into the whipped topping for unique marbling
- Roll eggs in multiple colors for layered effects
- Use less whipped topping to enhance color vibrancy
Frequently Asked Questions
How Do You Dye Eggs With Cool Whip?
You spread Cool Whip, add food coloring, swirl it, then roll your hard-boiled eggs in the mixture.
Let them sit for 5-10 minutes, then wipe or rinse off the Cool Whip to reveal colorful, marbled eggs.
Can You Dye Cool Whip?
You can’t dye Cool Whip itself because it’s white and fluffy, but you can mix food coloring into it to create a colorful base for dyeing eggs.
The Cool Whip holds the color and creates fun patterns.
How to Dye Eggs Step by Step?
Imagine you want vibrant, marbled eggs for Easter. First, soak hard-boiled eggs in vinegar, then roll them in Cool Whip mixed with food coloring.
Let them sit, wipe clean, and enjoy your colorful creations!
Can You Eat Eggs Dyed With Cool Whip?
Yes, you can eat eggs dyed with Cool Whip, but make sure to rinse them well to eliminate any residue.
Keep them refrigerated and consume within a week to guarantee they stay fresh and safe to eat.
Conclusion
Now that you’ve mastered dyeing eggs with Cool Whip, you’re part of a fun tradition—did you know over 90 million eggs are dyed each Easter in the U.S. alone?
Using Cool Whip not only makes your eggs look stunning but also keeps the process mess-free and creative. This method is perfect for those who want vibrant, marbled eggs without the usual hassle.
So, next time you want to try egg dyeing with Cool Whip, remember you’ve got a simple, tasty trick up your sleeve! Happy dyeing with Cool Whip!